Proxmox: Type 1 Hypervisor
There’s countless platforms on which you can start your journey, It can be as simple as enabling post on a windows machine where you have Docker installed. But experience tends to lead experts to a single conclusion: Eventually your Homelab will grow. So, the simple solutions that may work for small environments, like running a few containers to tinker with apps, may not work so good in the long run.
Why Proxmox?
Because it has everything you need, from SOHO to Enterprise.
What usually happens with Homelabs – and I speak from experience – it’s that the lab is initially built with one intention that later on will not longer match our production environment, and once our servers are running and we start configuring things and adding applications, it gets harder to migrate that to a better system or sometimes we can’t turn the Homelab off because is running the household backups.
How we fix this? I put it simply like this: Start with the solution to a problem you won’t have.
That’s why, Proxmox should be something you want to consider from the start.
I’m not saying this is the only way, or even the better way, I’m just saying, you will find out, in the long run, you will need and Hypervisor and more than one system.
Let’s say, being conservative, that your spend between 10 and 20 thousand dollars on all your gear. This is:
- Server or servers.
- Storage. Multiple Hard Drives and HDD Bays for your servers.
- Cabling
- Memory
- Processors
- Video Cards
- A Rack, maybe, if you want to be the cool kid on the block.
- Power installation and monthly power bill.
- Time and effort getting all working together.
- High Speed Bandwidth. Preferable 1Gbit and up.
This is a lot to take things lightly, imagine all this running your movies and music server, your photos backup for the whole family, your monthly planner, your invoicing software, your personal websites, and the list goes on and on, you get the point. Having this up and running reaches a point were you or more people are dependent on this systems being, well, up and running, so shutting them down becomes less of an option. And what happens when the system gets too big? you need to keep experimenting, but you are restricted by a production environment
you are not longer on the stages of developing, testing or staging things, but you are accountable to other users.
If you are running a single instance of Ubuntu Server or Red Hat or even Windows Server this becomes an time consuming task with a lot of downtime.
Proxmox, being a Virtualization Hypervisor, will let you run various systems at the time, so you can have your Server running while you test things on a different environment without breaking the bank or having to invest in more than one server.
Now, I could write a long and boring text on how to install Proxmox, but I recognize the creativity and skills of Jeff Geerling from @CraftComputing explaining this on his Youtube channel: https://www.youtube.com/watch?v=sZcOlW-DwrU
Don’t worry, we will follow along this tutorial. Is a technical tutorial, with a lot of extra tips, definitions and acronyms, but keep the goal in mind: To get Proxmox installed in your empty hard drive and get the Operative Systems running on top of it.
First, we get our hands on a copy of Proxmox Virtual Environment ISO by going to Proxmox download page
The last version at the moment of writing this is 8.2 but it could be an update, so, be sure to check.
Now, when creating bootable USB drives, I prefer Ventoy. It’s great and it allows you to storage several OS in a single pendrive in case you need more than one system.
Assuming you have a single drive the installation is pretty straightforward. In this particular case, Jeff has 2 empty drives in his system, so he will set a RAID 1 configuration.
Note: Disk mirroring, also known as RAID 1, is the replication of data across two or more disks. The term “disk mirroring” is sometimes used in a broader sense to describe any type of disk replication, but in most cases, it is meant within the context of RAID 1.
He selects zfs RAID1. If you have one drive you have 2 options to choose from:
- ext4: Good for smaller size files and limited CPU bandwidth
- xfs: If you have large files, XFS is the best choice. XFS can perform input and output simultaneously, users and front-end applications store and retrieve data more quickly.
From mine and other’s points of view, XFS capabilities are the ones we are after when setting up servers, but you are free to choose ext4 if your hardware is not as powerful.
In the bottom of the screen of the Proxmox VE installer, we can select the Target Harddisk. Make sure you select the right one, since the next steps will erase everything on it.
Next is selecting Region, Root Password, and configuring your Network.
This is where we start customizing things to match what we want.
Network breakdown:
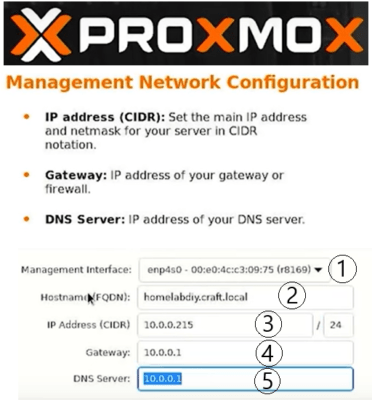
- The Management interface is the physical interface your machine uses to connect to the internet, this can have a different name on your computer, but is basically where the Ethernet cable connects into your Server.
- Your local hostname can be anything that you like as long as is in that format, in my case is myhomelab.proxmox.local
- The IP address is where you grant your machine with a unique identifier on your network. Every device on your network has a IP that has been granted by your router/modem(Gateway). In here we will choose the one that this machine will ask your router/modem(Gateway) for every time it starts. A rule of thumb is: if your router – Gateway – IP is, let’s say, 192.168.1.1 , then most of the devices in your network will follow that IP pool, the first device after your Gateway will be 192.168.1.2 , the next one 192.168.1.3 and so on.
So, if you usually have 10 to 20 devices at home, it’s wise to choose a higher IP number, e.g. 192.168.1.120 to avoid having conflicts with other devices in your network. Some Gateways will let you use a different Sub-net, e.g. 192.168.2.1 . Now, that is better, but it depends on your router’s (Gateway) capabilities. - Your Gateway is as we know now, your router’s IP address.
- Usually, ISP (Internet Service Provider) modem/routers will also serve as DNS servers, so, it’s safe to assume, your Gateway and your DNS server are the same device. we will use the Gateways IP for this.
Now we can proceed to the installation.
Once the installation finishes, we can now access Proxmox via a browser in our local network.
Go to ANY of your machines that connects to your local area network (LAN) and type Proxmox’s IP address followed by port 8006, e.g. https://192.168.2.1:8006 in the search bar of your favorite browser.
To login, the user is root, and the password is the one you set during installation.
You are now the proud owner of a Proxmox Server! 
But, what’s next? Here comes the good part!
We will Install Ubuntu Server. For this, we go to Ubuntu’s Server ISO download page and get the latest ISO image.
Follow Jeff instructions to upload the ISO to Proxmox: https://youtu.be/sZcOlW-DwrU?t=558
Once you ISO image is uploaded, we will create our first Virtual Machine (VM)
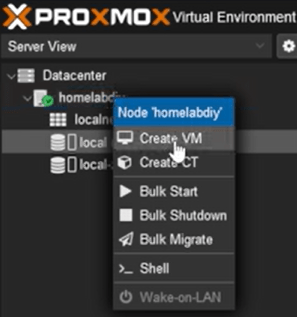
For this we will right-click on our homelab main folder (in this case labelled “homelabdiy”) and choose Create VM.
This will start the VM Wizard to guide you through the process of setting up your VM. Proxmox will assign a unique identifier (VM-ID) to your VM, from a range of 100 to 999,999,999.
A 3 digits unique ID and an easy to identify name is the recommended option.
Virtual Machine Optimal Beginners Settings:
- General Tab: ID: 101 – Name: Ubuntu-Server-1
- OS: Use DVD ISO Storage: local – ISO Image: ubuntu-22.04.iso – Type: Linux – Version: 6x 2.6 Kernel
- System: Graphics Card: Default – Machine: q35 – BIOS: OVMF (UEFI) – EFI Storage: local-xsf
Note: Default (i440fx) is legacy, old hardware, while q35 is for UEFI, used in modern machines.
- Disks: SCSI – Storage: local-xsf – Disk Size: 80
- CPU: Sockets: 1 Cores: 4
- Memory: 4096 minimum
- Network: Bridge: vmbr0 (bridged network) – Model: VirtIO (paravirtualized)
- Confirm.
Once the creation process finishes, you should see your Virtual Machine on Proxmox’s side bar. Now it’s ready to boot up.
Double click on your newly created VM to bring up a Virtual Console, this will serve as your monitor, keyboard and mouse for interacting with your VM.
Once you click Start Now, you will see your VM booting for the first time.
If your new VM boot into your Ubuntu Server Installer, congrats! you just created your first Virtual Machine.
This is not mentioned on Jeff’s video, but what you may want to do, is to duplicate these settings to have 2 identical (except for the name) Virtual Machines, one were we can deploy and test things, and one for production/live environment.
The video continues by touching a essential category: Networking.
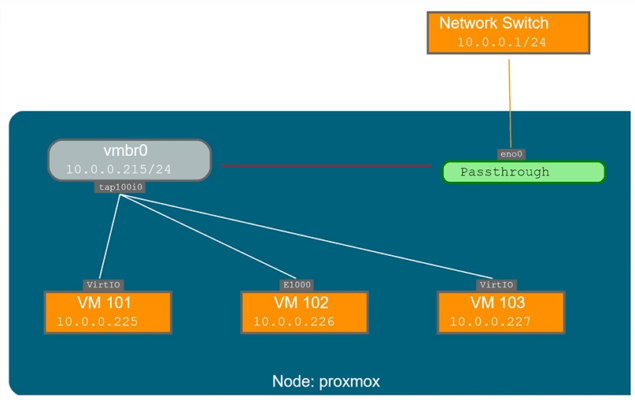
For Virtual Networks, Proxmox creates a Bridge Network using a Virtual Switch.
When installing Proxmox we get asked to provide an static IP address, what we were actually doing was creating a virtual network bridge.
Proxmox creates a Virtual Bridge and names it vmbr0, this gets assigned the static IP we provided during installation. Connecting this physical (hardware) and virtual (software) networks together (bridge)
In this case we have a virtual network bridge with an IP address of 10.0.0.215 linked to a physical network adapter which itself has no IP address at all.
All it’s doing is linking our virtual bridge to a physical cable so the bridge can communicate with the rest of your network.
The cool part about a network bridge is you can link it to multiple physical network devices to create redundant pathways out onto your physical Network.
Through these virtual links you can operate the network bridge like a managed network switch assigning VLANS (Virtual Local Area Networks) to each virtual machine or adapter creating internal-only networks so VMs can communicate among themselves but not to the outside world or link different VMs to different physical network connections.
In the next post we will see: How to Configure Your First Ubuntu Server


