Docker
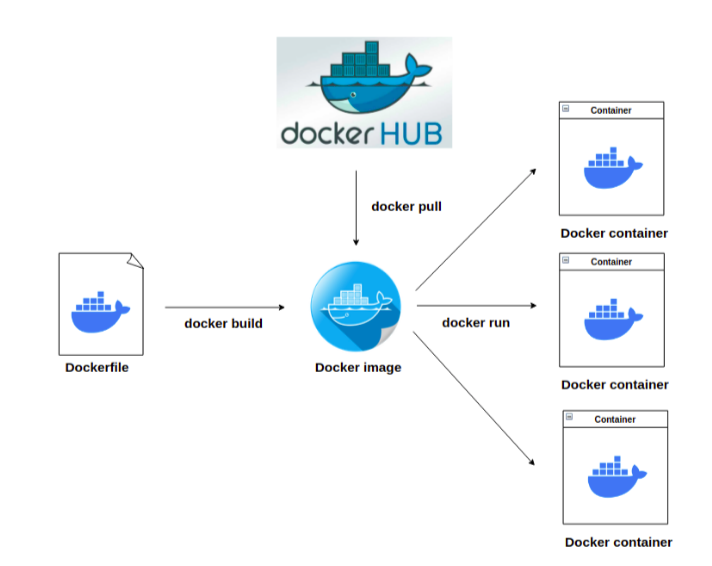
Docker is a tool designed to make it easier to create, deploy, and run applications by using containers. Containers allow a developer to package up applications with all of the parts they need, such as libraries and other dependencies, and ship it all out as one package.
By using containers, developers can be sure that their application will run on any other machine regardless of any customized settings that machine might have.
Docker provides a way to run these containers in a consistent and isolated environment, which can be very useful for deploying and testing applications.

So, as a constant tester and user of Apps and OS’s you can see why I choose Docker to run my Home-Lab server environment.
Down below i enumerated some of the benefits of using Docker compared to using Stand Alone Apps
- Testing applications in a consistent and isolated environment: By using Docker containers, I can test my applications in an environment that is consistent and isolated from the rest of my Ubuntu Server. This is particularly useful when I am developing applications that have complex dependencies or that I need to run on multiple platforms, like a Windows app and an Linux app.
- Running multiple applications on a single machine: Because Docker containers are isolated from each other and from the host system, I can run multiple applications on a single machine without them interfering with each other. This comes in pretty handy useful when i need to run a web server, a database, and other applications on the same machine but don’t want them to affect each other.
- Learning about containerization and microservices: Docker is a popular tool for developing and deploying microservices-based applications. By using Docker in my home lab environment, Im learning about containerization and how to build and deploy microservices-based applications.
- Automating the deployment of applications: THIS is the best feature in Docker, the deployment fase. As easy as creting a “Dockerfile” in which I can define the steps needed to build and deploy my applications. By using these Dockerfiles, I can automate the process of building and deploying applications, that saves me so much time and effort. Build and Deploy is as easy as a few lines of code thanks to the Docker-Hub from where the apps are pulled down from the cloud to my Docker instance.
Here is an example of how easy is to create a Dockerfile that can be used to build an image containing a static website:
I will start by the basics so you can follow along with me, the same way I learned it.
Im running Ubuntu Server (Headless, as in: no graphic interface, just a terminal)
To Learn how you can deploy your own Ubuntu Server, you can refer to this guide.
Once the server is up and running, I can connect to it via SSH from a terminal on my computer to the IP address of the server on my local network.
This are the devices we are going to focus running on my local area network (LAN)
You can see below, the Public IP from the Internet Service Provider (ISP) is not needed for this example since we are working with the IP’s that it’s been given to our devices by the TP-Link Switch.
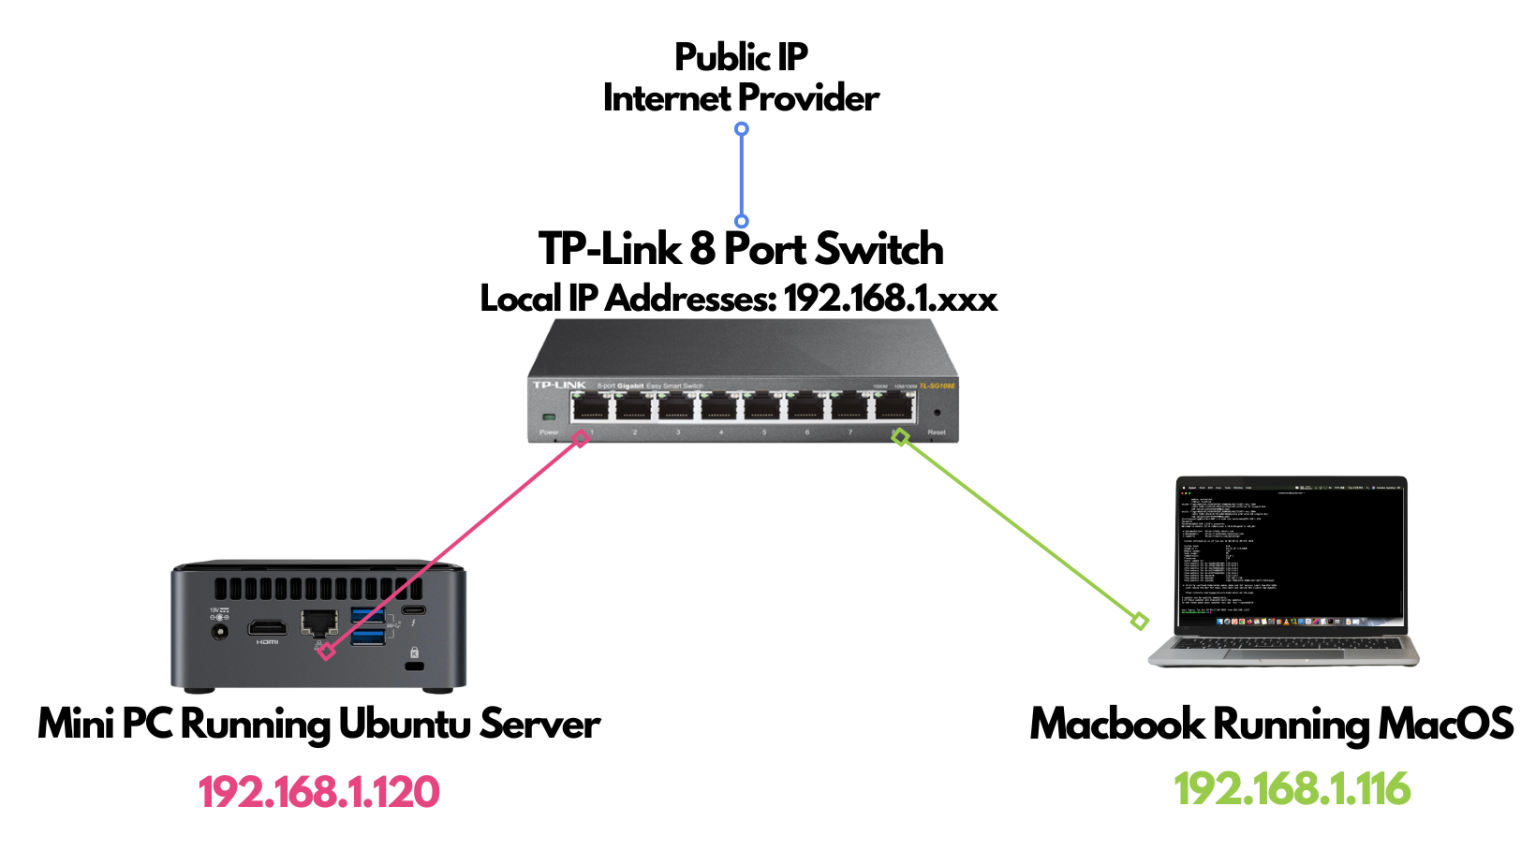
In the picture above you can see the simplest configuration for a Domestic Local Environment Server Deployment.
During Ubuntu Server installation I choose a Static IP Address: 192.168.1.120 so it will always ask to the switch for that same IP. This is very handy when working with targeted machines on a network as is the case of this server, it will allow me to call to that IP address and find it if it’s connected and powered on.
Carry on, my laptop it’s been given an IP address by the Switch using -NOT Static IP- but something called DHCP which translates to Dynamic Host Configuration Protocol. It’s an automatic way that Switches and other devices like a Wi-Fi access Point to handle IP addresses on an always changing environment. For now, the IP on my laptop is 192.168.1.116
To connect to the server using another computer on my network there’s a few things that need to be in place and configured beforehand:
- The server needs an Static IP
- The server needs to have a SSH (Secure Shell) service/server installed and running
- The server needs an User and a password
- The computer connecting to the server needs a Terminal App (In this case im using Hyper for MacOS, but you can use the default Terminal that comes with MacOS)
Now that the checklist it’s complete we can fire-up our Terminal and use SSH to connect to our Server. It looks something like this
sudo ssh [email protected]
Let’s Break Down what all that means.
First we have sudo
sudo is a Unix command that allows a user with the appropriate privileges to execute a command as another user, usually the superuser (which is usually named root). This is often used to perform tasks that require administrative privileges. For example, if you need to install software or change system settings, you might use sudo to execute the relevant commands with superuser privileges. sudo is short for “superuser do,” as in “superuser do this command.”
To use sudo, you simply type sudo followed by the command you want to run as the superuser. You will be prompted to enter your own password to confirm that you have the appropriate privileges to execute the command. If you enter the correct password and the command is successful, it will be executed with superuser privileges. If the command is unsuccessful, you will receive an error message.
It is important to use sudo with care, as it allows you to make changes to your system that could have serious consequences if done improperly.
So, sudo will give my terminal on MacOS the power to do things without asking for permission or my admin password every time. But be aware, with great sudo power comes great responsibility, and also you can break a lot of things if it used wrong.
Next we have ssh
SSH or Secure Shell is the command we are going to be running as Super Users from our MacOS terminal. This is telling my Mac to use a Secure Shell Protocol to connect to a given Address or machine on the network. To learn more about how SSH works you can check the documentation here. For now, and to keep it simple, let’s say, it opens a secure connection from my MacOS terminal (192.168.1.116) to my Ubuntu Server ssh Terminal(192.168.1.120)
Next we have a cheeky name hackerman
“hackerman” is the User Name I decided to use on my Ubuntu Server, nothing special here, went with that name just for fun and making a nod to that Mr. Robot meme. You can put any UserName you want while running your server’s installation. In my case is hackerman and is the user im going to be connecting to, to reach my server and make modifications on it.
At the en of the command we have the @192.168.1.120
The @ marks the spot. this is telling my Mac Terminal that i will be connecting to that location as in “at” = “@” And lastly the actual location of my server on my network 192.168.1.120
Now we got that out of the way, this is how it looks from my terminal app on my laptop:
Nick@Macbook ~ $ sudo ssh [email protected]
You will notice every time you open your terminal app it will tell you where are you running commands from, in my case im the user Nick “at” my Macbook and everything after the $ sign is the commands we tell the terminal to execute.
Your terminal app will ask for your Mac user password first (remember that sudo) and then it will ask for the server’s user password, in my case it looks something like this:
[email protected]’s password:
Once you succeed the terminal will prompt the welcome output from your server, and your terminal user@location will change to the one on the server, mine looks like this:
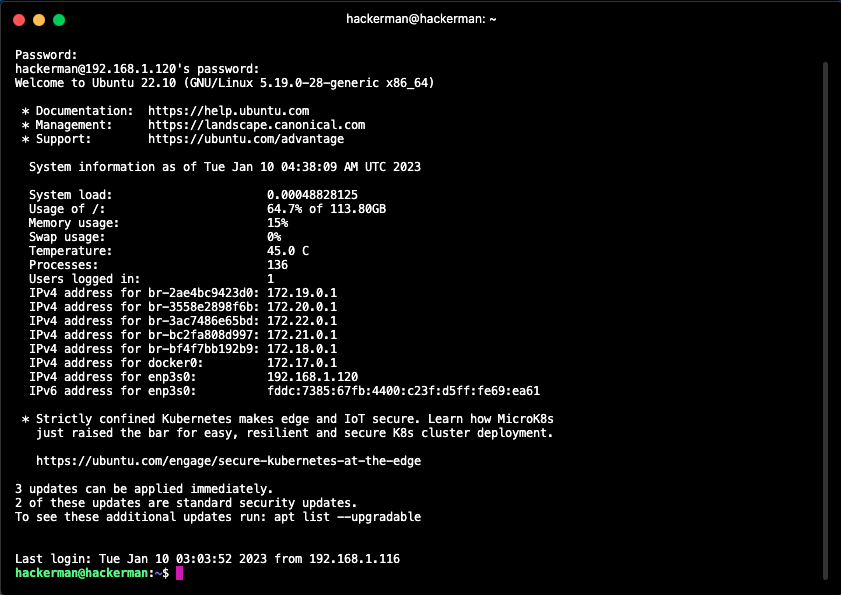
Notice how now, even that I’m typing from my laptop, my terminal is running commands from somewhere else, hence the hackerman@hackerman:~$ that indicates we are now in control of another user on another machine. Just to make it clear: BOTH my user and server are named hackerman (sorry for the confusion)
But your could be something like user@server:~$
Notice also right above hackerman@hackerman:~$ we can read ” Last login: Tue Jan 10 03:03:52 2023 from 192.168.1.116 ” that is our laptop right there.
If you made it ’til here, congrats! kudos to you my friend.
Alright! We have a server and we had successfully connected to it. Now What?!
Its time to install Docker!
First of all we have to make sure our Ubuntu Server is Up-To-Date. We can do it using the following command:
sudo apt update
Yes, you read it right. it’s that simple to update the whole server. No hassle. Just a simple command. Let’s beak it down really quick:
- sudo > (we know what that means already)
- apt > This is Ubuntu’s Advanced Packaging Tool that takes care of installing packages on the system
- update > an order [OPTION] you give apt to execute. in this case is update which tells apt to check and update its packages according to the last releases
I wont go in deep into the whole apt update. But basically what it does is to check for dependencies on a local file, and compare what is installed on the system and what it’s available online according to the web addresses of those dependencies. For now this is all you need to know. If you want to know more you can learn a lot about apt here.
So far so good. System it’s up to date, now we need to install Docker dependencies, we do it this way for Docker to get updated every time we update the system using sudo apt update
As you can see from my terminal I already have docker as one of my dependencies, i had installed it before. But if it’s not on your system, we need to do the following to add the repository to our library.
Add the necessary repository
Add the necessary repository (as the version of Docker found in the standard repository isn’t the latest community edition we want). We will add the official Docker GPG key with the command:
curl -fsSL https://download.docker.com/linux/ubuntu/gpg | sudo gpg --dearmor -o /usr/share/keyrings/docker-archive-keyring.gpg
(note: if your system trows an error saying curl is not installed, you can install it by typing: sudo apt install curl )
Next, add the official Docker repository:
echo "deb [arch=amd64 signed-by=/usr/share/keyrings/docker-archive-keyring.gpg] https://download.docker.com/linux/ubuntu $(lsb_release -cs) stable" | sudo tee /etc/apt/sources.list.d/docker.list > /dev/null
Install the necessary dependencies
We’ll next install the required dependencies with the command:
sudo apt-get install apt-transport-https ca-certificates curl gnupg lsb-release -y
Install Docker
Finally, update apt and install Docker with the following commands:
sudo apt-get update
sudo apt-get install docker-ce docker-ce-cli containerd.io -y
Add your user to the Docker group
In order to be able to use Docker without having to invoke it with sudo (which can lead to security issues), you must add your user to the docker group with:
sudo usermod -aG docker $USER
Log out and log back for the changes to take effect.
Docker is now ready to use on your Ubuntu machine.
Testing the installation
Once Docker is installed, you can verify the installation by issuing the command:
docker version
In the output, you should see something like this:
Server: Docker Engine - Community
Engine:
  Version:          20.10.14
Let’s make sure your user can run a Docker command by pulling down the hello-world image with:
docker pull hello-world
If the image successfully pulls, congratulations, Docker is installed and ready to go. Next time around, you’ll learn how to deploy your first container with Docker.


