Raspberry Pi Projects
NexcloudPi
Since I built my Home-Lab Server I have been migrating all my services to Docker Containers. Before that I was looking for a easy and straightforward way to host my files without having to rely on a NAS, since I had already a bunch of 2tb hard drives lying around I decided to get my hands on a Raspberry Pi and give NexcloudPi a shoot. And I had my personal cloud for about a year running smoothly between my devices. Like everything in tech, eventually has to be upgraded, my single node, stand alone, headless media storage server had to move to a bigger machine. But it is still today a fun project were one can learn a lot by simply playing with Raspberry OS’s and file management.
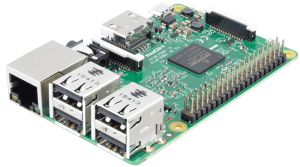
I think Raspberry Pi is the best gadget for all the technology enthusiasts for building solutions. Whether the project is for your engineering a solution or self-learning, choosing a project based on a real-life problem and building a solution for the same is the best way of learning.
Raspberry Pi is a credit card or we can say a pocket-sized computer that plugs into your TV/monitor and a keyboard. It’s a powerful PC that can run applications such as word processing and games, and it also plays high-definition video. You can use it to learn to code, too.

To install Nextcloud on your Raspberry Pi, you will need to install the Raspbian operating system on your device first. Once Raspbian is installed and running, you can follow these steps to install Nextcloud:
- Install the Apache web server and PHP by running the following command:
sudo apt-get install apache2 php7.3-fpm - Download the Nextcloud installation package by running the following command:
wget https://download.nextcloud.com/server/releases/nextcloud-20.0.2.tar.bz2 - Extract the package by running the following command:
tar -xjf nextcloud-20.0.2.tar.bz2 - Move the extracted files to the web root directory:
sudo mv nextcloud /var/www/html/ - Create a new Nextcloud configuration file by running the following command:
sudo nano /etc/php/7.3/fpm/pool.d/www.conf - Change the owner and group of the Nextcloud installation to the web server user:
sudo chown -R www-data:www-data /var/www/html/nextcloud - Create a new database for Nextcloud by running the following command:
sudo mysql -u root -p - Create a new database user and grant permissions to the database by running the following commands:
CREATE USER 'nextcloud'@'localhost' IDENTIFIED BY 'password';
GRANT ALL PRIVILEGES ON nextcloud.* TO 'nextcloud'@'localhost';
- You can access and configure your Nextcloud by visiting
http://your-raspberry-pi-ip/nextcloudin your browser.
Aaaaand Done! Keep in mind this is a rough guide, and you may need to modify some of the commands depending on your setup. Also, before installing Nextcloud, check that the version number is the last one.
Raspberry Pi Intruder Alarm
If you have a place/site and don’t want any unauthorized access to that place, in such situations an intruder alarm comes in handy. If you are looking for a low-cost alarm system raspberry pi is the best choice. It can be built using different sensors like motion sensors and an alarm. Additional features like reporting intrusion to your android phone can be implemented.
You can install this system at your home, office, garage, etc

Intruder security alarm using the PIR sensor and Raspberry Pi
An intruder alarm is used for security purposes as it is installed in the surroundings of doors and windows so that when the movement is sensed by the PIR sensor, it generates the alarm about the unauthorized motion in the sensitive places. For those who don’t know about the PIR sensor, the Passive Infrared (PIR) sensors are used for detecting the motion of human beings, animals, or even any other object.
To make an intruder security alarm using Raspberry Pi, we need the following electronic components:
- PIR sensor module
- Breadboard
- Jumper wires
- LED
- Piezoelectric buzzer
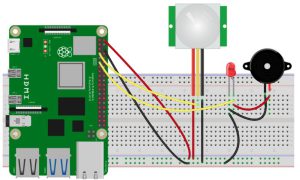
The schematic circuit diagram of an intruder security alarm using the Raspberry Pi 4 will be:
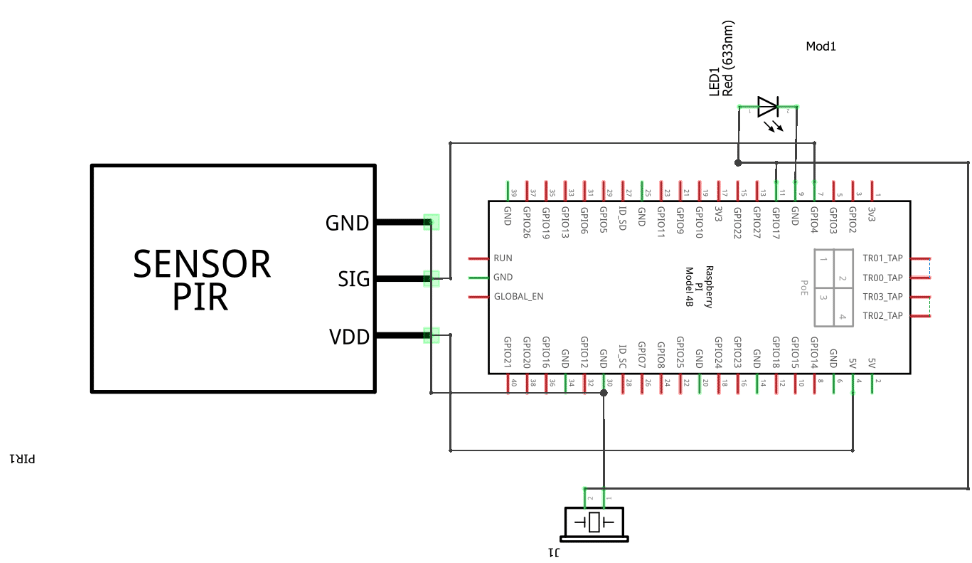
To configure the circuit of an intruder security alarm according to the above circuit diagram, we will first place a PIR sensor and a Raspberry Pi 4 on the circuit board. Please note that the PIR sensor has three terminals, black one is for ground, the middle yellow one is for the output, and the red one is for the power supply and next, we will place an LED on the breadboard, once that’s on place, we will place the piezoelectric buzzer with the LED on the breadboard:
Now, we will make the connections of all the modules with the Raspberry Pi according to the table given below:
| Ground of PIR sensor | Connect it with the series short ports (-ve) |
| Output of PIR sensor | Connect it with the GPIO pin 4 of Raspberry Pi 4 |
| Vcc of PIR sensor | Connect it with the other series short ports (+ve) |
| Cathode of LED | Connect it with the series short ports (-ve) |
| Anode of LED | Connect it with the series short ports (+ve) |
| Cathode of piezoelectric bulb | Connect it with cathode of LED |
| Anode of piezoelectric bulb | Connect it with the GPIO pin 17 of Raspberry Pi 4 |
| Series short port of breadboard (-ve) | Connect it with ground port of Raspberry Pi 4 |
| Series short port of breadboard (+ve) | Connect it with “5 volts” port of Raspberry Pi 4 |
The complete circuit assembled on breadboard:
What is the Python code for an intruder security alarm with Raspberry Pi
Once all the connections are done, open the terminal and using the nano editor make a file with name “python my_pir_code.py” using the command:
$ python my_pir_code.py

Type the following code in the opened file:
from gpiozero import LED # import the LED library from the gpiozero
from gpiozero import MotionSensor # import the MotionSensor library
led = LED(17) # declare the GPIO pin 17 for the led output
sensor = MotionSensor(4) # declare the GPIO pin 4 as motion sensor output
led.off() # turn off the LED
while True: # initialize a infinite while loop
sensor.wait_for_motion() # it will wait for the motion detection
led.on() # turn on the LED
sensor.wait_for_no_motion() # it will wait for the motion detection
led.off() # turn off the LED

What is in the above Python code
We have first imported two libraries of “LED” and “MotionSensor” from the gpiozero. Then declare the GPIO pin 17 of Raspberry Pi for LED and GPIO pin 4 for the PIR sensor and save the values in led and sensor variables respectively. Finally, in the infinite while loop, turn on the led if the motion is detected and turn off it when there will be no motion detected.
Note: The piezo buzzer is connected parallel to the LED, so there is no need to write code for the buzzer as it will turn on and off with the operation of the LED.
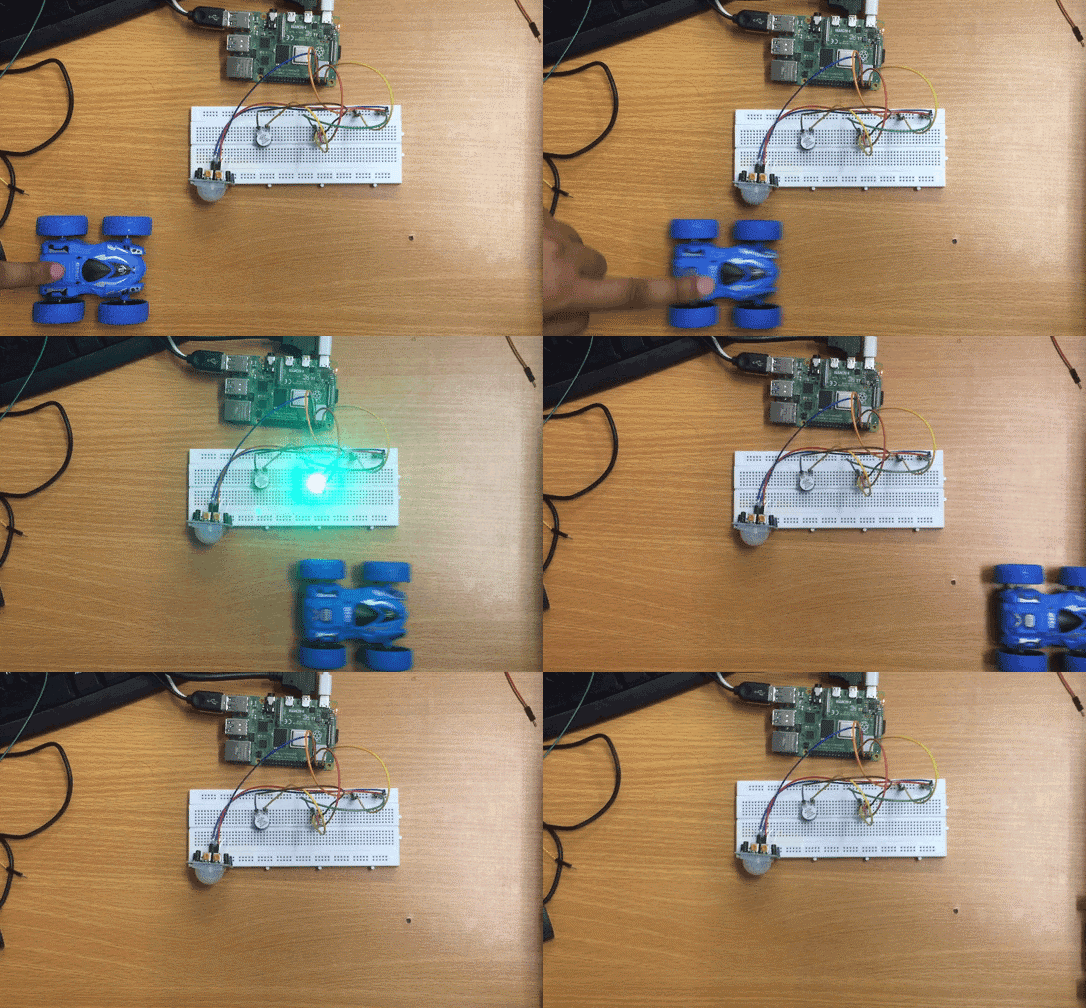
The working of the intruder security alarm is:
What should we do if the LED is remain turned on
There is no need to be worried that your configured project is not working properly, place the PIR sensor in front of you and rotate its knobs to the extreme left, this will reduce the delay time and the sensitivity to the lowest value. Once done with it, connect the Vcc pin of the PIR sensor and let it aside for one minute as it will take time to energize after one minute connect the output pin to the GPIO pin 4 of the Raspberry Pi and enjoy the operation of the project.

Conclusion
The intruder security alarm is used to detect the motion in its surroundings with the help of a PIR sensor. This project is very useful to apply in the sensitive doors or lockers so that when an unauthorized person tries to enter that room, the alarm will notify the concerned security personnel about that unauthorized motion. In this write-up, we have made the intruder security alarm with the Raspberry Pi using a PIR sensor.
More Cool Projects Like this one i’ve been doing over the years con be found on the next links
Host your Website
Flask Webserver On Raspberry Pi
In this article, we will look into setting up a Flask webserver on Raspberry Pi. For the sake of this tutorial, we will keep things simple and beginner-friendly. Feel free to look up other articles on Flask to develop your websites further!
Personal Assistant
Setting up Home Assistant on the Raspberry Pi
Home Assistant is an open-source home automation software that was built with devices like the Raspberry Pi in mind.
The software is designed with a focus on protecting your privacy and keeping control in the user’s hand.
Measuring Tool
Raspberry Pi Internet Speed Monitor
In this Raspberry Pi internet speed monitor tutorial, we will be showing you how you can set up your Raspberry Pi to monitor your internet connection and save the data to view in Grafana or Google Drive.
Extender
Simple Raspberry Pi WiFi Extender
A Raspberry Pi WiFi Extender is a cheap and power efficient way of increasing the total range of your WiFi Network. A WiFi extender differs a fair bit from a WiFi access point.


